Wednesday, October 30, 2013

Too Faced "A few of my Favorite Things" Holiday 2013 palette Review

Hello makeup lover!

Today I have an exciting post for you. I recently purchased  Too Faced "A few of my Favorite Things" palette set from Sephora and all I can say is wow!!! This palette is so freakin' awesome you guys. This set includes 20 eyeshadows, 2 blushes, 2 bronzers, a full size Lip Injection Color Bomb, and a deluxe size Better than Sex Mascara all for $56!!! I definitely think Too Faced did a great job on this. There is a good mixture of colors, finishes and textures. I personally think all eyeshadows have a great color payoff, which at times can be lacking in larger palettes like this one. I really love all the shades available and the color combinations are endless. This set makes an awesome holiday gift for that makeup lover in your life!!

I hope you enjoy the pictures and mini reviews below. There will be many holiday tutorials coming up soon on my beauty channel. Click here to see my current videos and to submit any video requests :)


            Outside packaging 
Cute pink & gold chevron clutch
Palette with deluxe size mascara
& Full size lip plumper
Better than Sex Mascara ----> clever name!
It applies nicely to lashes but I don't think it
gives me the volume and thickness I like. The formula
is a bit wet and is a rich black color.
Lip Injection Color Bomb in "Bee Sting" (full size)
Honestly, it's not my favorite lip plumper. It feels
uncomfortable to me. It definitely has a stinging feel on the
lips, which sadly is a turn off for me.
The actual color is a nice nude-y pink.
A look inside the palette with the extra pieces of this
kit to the left
Gorgeous eyeshadows!!!!
So in love with the color selection, the finishes, textures
& great color payoff.
A closer look at the blushes and bronzers. It's a good
mix of colors that can go with any eye look.
**Swatch-y goodness below are in order as they appear by rows inside the palette.

Row #1 (names are R to L)
Snowflakes- shimmery champagne
Whiskers on Kitten- golden peach with chunky gold sparkle
Milk Chocolate- matte medium tan
Moon on Their Wings- rose gold with chunky sparkle
Dark Chocolate- matte deep intense dark brown
Row #2 (names R to L)
Cream Colored Ponies- matte creamy ivory
Honey Honey- metallic true gold
Buche de Noel- metallic golden bronze
Evergreen- shimmery hunter green
Blue Satin Sashes- intense matte teal with fine gold glitter
 
Row #3 (names R to L)
Coquet- shimmery golden pink
Taffy- baby pink with a light sheen
Crisp Apple Strudel-metallic
Wool Mittens- matte medium brown
Soiree- matte burgundy with ultra fine multicolor glitter

Row #4 (names R to L)
Tinsel- metallic yellow gold
Bluff- shimmery blue-ish purple
Ooh la Orchid- matte bright grape purple
Party Time- metallic deep navy
Pure Glam- matte carbon black with fine silver glitter 
Blushes & Bronzers  (R to L)
Raindrops on Roses- shimmery bright but wearable pink
Melt in Spring- matte coral
Chocolate Soleil- matte medium brown with actual cocoa inside *smells yummy
Sun Bunny duo- shimmery light tan & shimmery golden brown

I know that was a lot of swatches but I wanted you all to see how amazing these colors are. I definitely have my faves……Blue Satin Sashes (incredible pigmentation btw), Tinsel, Bluff, Party Time and of course Pure Glam (I'm blown away by the pigmentation of this color)
What are your faves?

Thanks for stopping by,
xoxoxo
~Lexi

Sunday, October 27, 2013

Easy Fall Inspired Nails

Hello everyone,


Today I decided to do a fall inspired nail look and wanted to share with you the finished look. I really love this deep vampy wine red color for this season. To me it screams fall! And of course, the look wouldn't be complete without a little glitter. It's a great way to incorporate fall into your wardrobe. So I hope you enjoy this nail look as much as I do.

The finished look

Sinful Colors with gel tech in "Mirror Mirror"
& my d.i.y (franken) holographic glitter polish

My 1st franken polish
Holographic Gold glitter
The Sinful Colors nail polish can be purchased at your local Walgreens. As for my d.i.y polish, I have a video on how to make it coming up soon on my channel. I also have a few blog posts on the franken process coming with photos so check back soon. 

Want more? Follow me on Twitter to stay updated. Thank you for stopping by :) 
xoxoxo
~Lexi

Saturday, October 26, 2013

Purple & Teal Look + Foundation Routine

Hello all,

Today I posted a bright but wearable jewel tone purple and teal makeup look on my channel. I also show my foundation routine along with other favorite everyday makeup products. Head on over to my channel to see a video tutorial on this fun and easy look. I used the holiday 2012 palette from Tarte cosmetics, which is one of my favorite makeup brands. Their eyeshadows are so awesome. In this look I used a charcoal gray on the lids, a jewel tone purple mixed with a shimmery pale lilac in the crease, a matte peach for my brow highlight and of course a nice pop of a deep teal on the lower lash line mixed with the same colors used on the lid. Below are pictures of the final look which I love! Try it out and let me know what you think :)


Want to see and know more? Keep with Me on Twitter
Don't forget to subscribe to my YouTube channel :)
Want to read about my newest hobby ? P.S. it involves glitter

Thank you for stopping by and showing support!!!!
xoxoxo
~Lexi

Thursday, October 24, 2013

Making D.I.Y Nail Polish & Helpful Tips

Hello everyone!


I have recently decided to embark on a new adventure with creating my own nail polishes. Yeah, you heard that right! I'm trying this whole "frankening" thing. I wanted to share with you all my recent loose glitter purchase from an Etsy shop.

So if you don't know what "frankening" is, then I'll explain this magical process. It's basically a term used loosely to describe homemade nail polishes. As to were or from whom that word came from, who knows. I have become familiar with the Etsy website and I have found many glorious things there. If you've never checked out the site, please do (link is at the end of this post). I found several listings of homemade nail polishes where most of them are pretty affordable. I wanted to order tons, and a thought just popped into my head. If these sellers can make them to sell, then why can't I? I'm not looking into selling my creations....yet! We'll see how this turns out first. Besides this way more fun and cheaper.

There have been many videos on YouTube and tons of blogs about "frankening" at home. Many of those can be useful. I tried to find as much information as possible to make a wise decision on what types or kinds of glitters to use and buy, the proper solution for making the polishes, materials needed and of course where to start this new hobby. After doing research, I was left with several questions needing answers which is why I feel some videos and blogs weren't completely helpful. So I have put a lot of effort into this idea and I would like to share my tips with you. I plan on doing several posts on this process, so if you want to know more as I go along then follow me on Twitter

One of my first glitter purchases from The Glitter Source on Etsy. This shop has tons of glitters available for nail polishes and crafts. Every possible size, shape and color is available. A bonus is that they are very affordable. If you want to browse their site click here---> Theglittersource
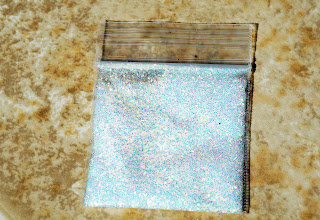
I purchased their Solvent Resistant Holographic Glitter Sampler set for $12 and it includes 8 small 2"x2" zip lock bags with about 1 teaspoon of glitter. I know 1 teaspoon of glitter doesn't sound like much but it will make several polishes especially when mixing different sizes and colors into one nail polish bottle. These little zip lock bags contain a generous amount too. The average amount of glitter sold individually through various glitter sellers on Etsy is about 1 teaspoon. A lot of sellers have larger amounts available for a little bit more money. I personally like sampler sets since it offers lots of color options more affordably like the one below.

It is very important to use Solvent Resistant glitter for making nail polishes. Why? Because being solvent resistant ensures that your polishes won't become tinted from the glitter color fading into the polish solution. Solvent resistant glitters perform better than craft glitter when put into glitter suspension base. I have tried the whole mixing clear polish with craft glitter and wasn't too pleased with the results. I will share that with you soon. I will do a post on glitter suspension bases as well so stay tuned.  Below are pictures taken in direct sunlight to show you all how beautiful these glitters are. I have enlarged the photos to display the holographic effect of these glitters. Holographic finishes are an extremely popular nail trend at the moment. More posts are coming in the future of d.i.y nail polishes and tips.

Solvent Resistant Holographic Sample set
$12

Jet Black

Sparkly white

Rainbow Purple

Rainbow Teal

Rainbow Gold

Rainbow Turquoise

Rainbow Rose

I really love the finishes of these glitters. I can't wait to share my creations with you all. Video will be coming soon too!
Follow me on Twitter: https://twitter.com/glamourbylexi

I hope you found this helpful. Any questions or comments, please leave them below :) Thanks for stopping by,
xoxo
~Lexi

not sponsored

Monday, October 21, 2013

Festive Spooktacular Halloween Nails!

Hello Nail Art Lovers!


Today I wanted to share with you an easy Halloween inspired nail tutorial. Nail art can be intimidating at times but trust me this one is easy. If I can do it so can you :) I really love the finished look and I hope you do too. I posted a video tutorial on my YouTube channel for Manicure Mondays, so if you would like to see my Spooktacular Nails, head on over. I hope you enjoy. Below is a list of the things you'll need to recreate this festive look on your nails.


What you'll need:
* Black, Orange, Medium Purple, White, Yellow and some silver sparkly glitter. Any brand will do, just make sure you do 2 coats as a base before the nail art to get an opaque application.
*A Black and White striper polish. The ones I used are from Walgreen by the brand called Sinful Colors.
*A medium sized dotting tool. Don't have one? Just use the end of a sharpened pencil or the end of a bobby pin. If you want a set of dotting tools, here's where I bought mine-http://www.amazon.com
*Lastly you'll need your favorite top coat.

If you want to know the exact colors and brands that I used, head over to my channel.


I hope you all have a Happy Halloween!!!! Be safe this holiday. Thank you for stopping by. Don't forget to subscribe while visiting my channel. Stay tuned for more nail tutorials coming soon. Any requests? Leave your comment to this post.

xoxoxo
~Lexi


Thursday, October 17, 2013

Rimmel 9 in 1 BB Cream Review!

Hey guys!


So I wanted to do a quick review on the Rimmel 9 in 1 skin perfecting Beauty Balm (BB). Yes that was a mouth full, haha.

This BB cream can be found at any drugstore for around $6. Not a bad price for the amount of product you get which is a 1oz tube. I do like the texture and feel of this BB cream. It has a good amount of coverage, almost like a light to medium coverage foundation. I think this product would work great for normal, dry or slightly combination skin. Oily skin types won't benefit from this product. I think it's too thick and hydrating for oily skin. It leaves a very dewy (not shimmery) finish to the skin. Not very ideal for the oilier skin types. All other skin types would be fine to use this. If you find your t-zone to be a bit oily, just use a lightweight powder in those areas. The packaging is a small tube that is pretty basic and functional. The benefits of this product stated by Rimmel are listed in the picture below.

I do think for all skin types other than oily, that this would be a handy makeup product to have. It's great to have a good BB cream for those days where you wanted something quicker and lightweight. Also, if your a teen starting off with makeup, please use BB creams. I don't recommend starting with foundations unless you're very acne prone with active breakouts 99% of the time. If you only have a breakout or two every now and again, use concealers on top of this or another BB cream. What if you're not a teen? Well honestly, any age group can use this. The above was my personal recommendation for teens. If you are older with one of the ideal skin types for this particular BB cream mentioned above, then you may like this. What if you're oily? I would recommend the Garnier BB Cream for combo/oily skin. It too can be found at local drugstores.


The only compliant is the color selections. I believe my local Walmart only offered 3 shades. I think Rimmel should make more shades available. And possibly a version tailored for oily skin. If you try or have tried this product, I would like to know your thoughts. You can leave me a comment here or through Twitter .


Benefits of this BB Cream.

I hope you found this review helpful. A video review with swatches will be posted this week on my channel. Thank you for stopping by. Please checkout my YouTube channel for makeup tutorials, nail art videos (more coming soon), product reviews, monthly beauty must haves and daily life vlogs. If you stop by, please subscribe :) I'd love to have you as my subscriber!! 

Have a great day!
xoxoxo,
~Lexi

Wednesday, October 9, 2013

Breast Cancer Awareness Inspired Nail Art!

Hello Nail Art Lovers!


I wanted to support a great cause with this inspired manicure since it hits home for me. I have an aunt who has won the battle of cancer :) This is for those affected, those who are fighting, for the ones who've won and sadly for those who've lost the battle.  There's always a light at the end of the tunnel!


I hope you all enjoy this Easy and Simple Step by Step Nail Art. A video tutorial will be posted on my YouTube channel tomorrow morning!


Breast Cancer Awareness Inspired Nails


Step 1: Apply 2 coats of a light pink polish to your thumb and pinky nails. I used Essie "Raise Awareness"
Step 2: Apply 2 coats of a white polish to your index and ring nails. I used OPI "Alpine Snow"
Step 3: Apply 2 coats of a medium pink polish to your middle nail. I used OPI "Shorts Story"

*Once those layers have dried completely, proceed with the glitter and nail art!

Step 4: Using a small dotting tool, take your light pink polish and start creating the Breast Cancer Ribbon on your ring finger.
Step 5: Apply a pink glitter polish over the white on your index finger. I used LASplash "Sparkling Rose".
Step 6: Using the same pink glitter, apply it as a french tip to your pinky finger.
Step 7: Using the pink glitter apply it to your thumb in a fading motion starting at the cuticle line working towards the end of your nail.
Step 8: Once all nails are completely dry, apply a generous coat of top coat to seal your designs and add lots of shine. I used Out the Door Top Coat. And your Done!!!!!!

See I told you it was easy. I would love to see your creation of this nail art or what ever design you created for Breast Cancer Awareness month. Send pictures to my Twitter Follow me too!

Thanks for stopping by,

xoxoxoxo
~Lexi


Monday, October 7, 2013

BEST Drugstore Mascara!!

Hello awesome makeup lovers!


Yesterday I uploaded a review and demo of my current favorite drugstore mascara. I've been using Maybelline The Rocket Volum' mascara for about 2 months now, and I am in love! It really is awesome stuff. I do recommend. If you haven't watched the video, please do so :) http://www.youtube.com/watch?v=dKrYH-yFNT8


The video shows several before and after photos and shares my personal opinion on this drugstore gem.  Plus, you'll see exactly how I apply mascara everyday and you'll also get a few tips along the way. Please let me know what you think of this product if you've tried it. Also if you have any product recommendations or suggestions on products to review, please share. I would love to review more products that interest you!

Here are just a few snap shots of photos you'll see in my video review.

**Real results (no photoshop/enhancements)

Again real results!

Great basic mascara packaging with a fun cobalt blue.

Thank you for taking the time to read and watch my review :) Please subscribe below for more makeup goodness to come! http://www.youtube.com/user/GlamourbyLexi?feature=watch

Want more? *Follow or Tweet Me @GlamourbyLexi

xoxoxo,
~Lexi


not sponsored